Manually Scaling C3™ CMS DPI Settings to 1080p Resolution
-----------------------------------
Affected Roles: All Users
Related Digital Watchdog VMS Apps: C3™ CMS
Complexity: Low
Software Version: C3 CMS v1.1.4.77 or newer
Last Edit: July 29, 2024
-----------------------------------
High-DPI Resolution Display Issues
When using high resolution display monitors greater than 1080p HD, C3™ CMS may not scale the display resolution correctly. This means that if you are using a 2K or 4K display monitor, the program window and/or display text may appear to be “shrunken” and generally too small on the screen, causing the application text to be fuzzy and unreadable to the user.
In this event, users can manually change the DPI (dots per inch) scaling of the C3 CMS program in the Properties settings of the application.
This article will outline how to manually change the display resolution of C3 CMS application for high resolution displays encountering display scaling issues with the C3 CMS program.
Changing High-DPI Scaling
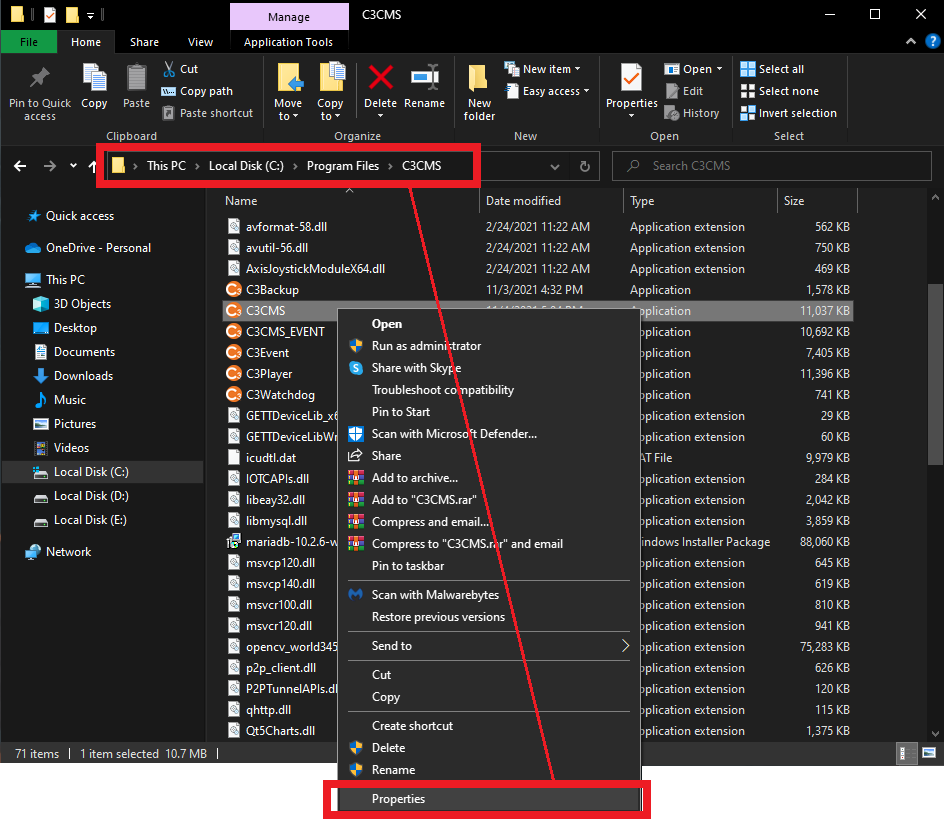
- Locate the C3 CMS .exe file in the File Explorer application.
Right-click on the executable file (.exe) and select “Properties”.

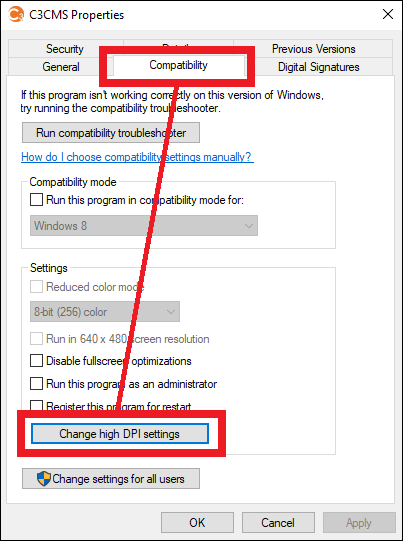
- The Properties pop-up will display.
Select the Compatibility tab.
Click on the “Change high DPI settings” button.

- Change the resolution settings” to set the resolution.
Some Windows 10 users may not see a “1080” DPI scaling option (depending on the Win10 build version). In this event, enable the “Override high DPI scaling behavior…” setting.
Select “Application” to allow the program to bypass system-wide scaling and define its own scaling parameters for high DPI monitors.
This issue occurs on a case-by-case basis, you may need to experiment with the three above options to find which option works best for you.
Your options will appear as follows:
-
- Application – Disables all Windows scaling settings and only use the app developer's setting. This option does not allow for user customizations, but instead uses the default application display settings. This option was previously called “Disable display scaling on high DPI settings” in previous versions of Windows.
- System – Overrides the program’s DPI settings and makes it run like it would on a low-DPI display. On a high-DPI display, this will make the program appear blurry.
- System (Enhanced) – Windows will try to use enhanced DPI scaling for this program. As a result, some programs will display with crisp text on high-DPI displays. This won't work for all programs, but is worth trying.
When finished, click the “OK” button to save the settings and close the pop-up.

Microsoft Information Source: https://support.microsoft.com/en-us/windows/make-older-apps-or-programs-compatible-with-windows-10-783d6dd7-b439-bdb0-0490-54eea0f45938


