

First Time Setup of a MEGApix CloudCam Camera
-----------------------------------
Affected Roles: Owner, Administrator
Related Digital Watchdog Apps: DW Spectrum Professional, DW IP Finder
Last Edit: November 11, 2025
-----------------------------------
Initial Configuration Setup
The DW MEGApix CloudCam Series is comprised of Digital Watchdog IP cameras that feature regular IP camera functionality but with the ability to act as its own, individual DW Spectrum Server as well.
This article will outline the initial setup process of a new CloudCam camera.
**NOTE: Do not merge CloudCam cameras with standard DW Spectrum Systems. CloudCam cameras are already acting as individual recording servers and use an ARM version of the standard DW Spectrum Professional program. The DW Spectrum Client (desktop version) will automatically detect the presence of the Edge Server during setup.

Supported/Affected Devices:
- MEGApix® Ai CloudCam Series
What to Know Before Starting
- CloudCam cameras use a version of DW Spectrum called “Spectrum Edge”, a version of DW Spectrum’s computing and storage resources at the location where data and video is produced.
- CloudCam cameras should only be merged with other CloudCam cameras when consolidating into a single System. A maximum limit of up to 30 CloudCam cameras, per System is recommended.
- Exceeding this camera limit or merging with a standard DW Spectrum Server may lead to operating issues.
- You may install more CloudCam cameras on the same local subnetwork if they remain unmerged and they are viewed using the Cloud Layout feature in DW Spectrum Client. It is recommended to avoid merging CloudCam cameras (in server-mode) into the same System as regular DW Spectrum Servers.
- CloudCam cameras are designed to be used as their own server. They store data locally on a mounted DS Memory Card and are not designed for the purpose of being added to external recording solutions, such as the standard DW Spectrum Server computer version. Do not merge CloudCam cameras with regular (non-Edge) DW Spectrum Systems.
For more information regarding CloudCam cameras, check out the KB article – CloudCam Explained.
Configuring a CloudCam Camera
If this is your first time configuring a CloudCam camera, use the guide below to learn about the step-by-step process.
Step 1 – Collecting Camera Information
Before mounting the camera in its installation location, collect the following information for your personal reference:
- Product Model Number
- Serial Number
- Recording License Key
This information can be found on the physical sticker that is pasted on the camera housing. This will typically be on the underside/foot of vandal dome models or on the underbelly of bullet models.
Keep this information easily accessible in your records as it will be needed in the unlikely event of a licensing issue or other problems related to the camera.
Step 2 – Configuring Network Settings
After powering and connecting the CloudCam camera to the local camera network, some networking configuration may be required. A new camera will use a DHCP addressing protocol by default.
- If the camera is connected to a network router or network switch with DHCP capability, the camera will automatically be provided with an IP address to match the subnetwork.
- If the camera has been connected to a device without a DHCP service, the CloudCam camera will continue to use its default IP Address (192.168.1.80).
If a camera is not accessible due to not being assigned an appropriate IP Address for the camera subnet, or if you need to change the IP Address that has been assigned to the camera, install the latest version of the DW IP Finder program. This application can be used to scan and locate DW MEGApix cameras within the network. Once found, you can assign the needed IP Address changes to cameras using DW IP Finder or manually assign an IP address directly to the camera with a web browser.
- Using DW IP Finder for Bulk IP Assignment
- Manually Assign IP Addresses with the Camera’s Web Interface
Step 3 – Updating Camera Firmware
DW MEGApix cameras are shipped to distributors with the latest camera firmware version that is available at that time. However, depending on how quickly the distributor sells and refreshes their stock, the camera may not have the latest firmware release at the time of the customer’s purchase.
Using up-to-date camera firmware is recommended since each released version will contain bug-fixes, quality-of-life improvements, and necessary updates to how the camera communicates with its recording server.
When using a new CloudCam camera, compare the firmware version of the camera to the version available on the Digital Watchdog website – https://digital-watchdog.com.
Use the DW Product Selector and locate the Downloads section on the product page of your camera model to find the most recent firmware version.
If the camera firmware is outdated, you can upgrade the camera firmware directly using the camera’s web interface or uploaded with DW IP Finder.
For more information about updating camera firmware, check out the article - Updating DW MEGApix Camera Firmware.

Step 4 – Updating DW Spectrum Edge Firmware
DW MEGApix CloudCam cameras are devices that both create camera video streams and record video locally. As so, each CloudCam camera uses two different firmware types to operate as intended.
- DW MEGApix Camera Firmware – responsible for running regular IP camera services (video stream creation, security authentication, etc.)
- DW Spectrum Edge Firmware – responsible for providing DW Spectrum Edge services (video record archival, system configurations, etc.)
It is important to be able to discern between these two firmware types when using CloudCam cameras.
**CRITICAL NOTE: It is highly recommended that the DW MEGApix Camera Firmware is up to date before updating the DW Spectrum Edge version. This will help to reduce the likelihood of issues arising during DW Spectrum Edge updates.
While DW Spectrum Professional major release versions are released every year or so, there may be instances where the DW Spectrum Edge version on a new camera is outdated as distributor stock is unlikely to be updated before being sold, whenever an update is released.
Two ways that the DW Spectrum Edge version can be updated include:
- Method 1: Manually Update – The current DW Spectrum Edge version can be found on the product page for all currently supported CloudCam cameras. The file will be downloaded as a compressed zip format. It is not required to extract the files from the compressed folder to implement the update.
New DW Spectrum Edge firmware can be uploaded in the camera’s Edge > DW Spectrum Edge menu.
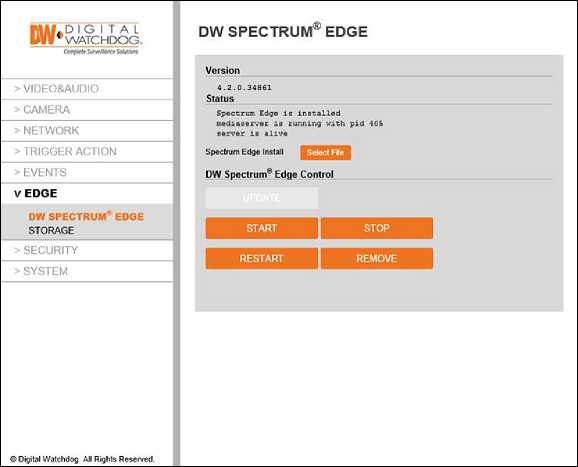
- Method 2: Automatic Update – The DW Spectrum Edge version that comes pre-installed with the CloudCam camera will be able to automatically scan for Edge updates if provided with Internet access. However, this method may not always have the true latest version as it is common to “soft-release” a new version before it is uploaded to the update server.
**NOTE: The DW Spectrum Edge Server will automatically begin to run when the CloudCam camera is powered ON and should not require action on the users part to do so. However, if you need to manually START or STOP the Edge Server, you can do so in the DW Spectrum Edge Control section of the camera’s EDGE menu.
Step 5 – Date & Time Configuration
When using CloudCam cameras as self-contained servers, it is important to ensure that the Time Synchronization between all devices is accurate. DW Spectrum’s archive management relies upon the date and time configuration being correct to effectively retrieve recorded video for video playback. While the desktop version of DW Spectrum Server uses the computer’s local time settings for time synchronization, DW Spectrum Edge uses the date and time settings as configured within the CloudCam camera itself.
To configure the Date & Time Settings, open the System > Date & Time Settings menu and confirm the following:
- Camera is using the correct TimeZone setting
- Camera is using the correct Date and Time (hh:mm:ss)
**NOTE: You have the option to use the Synchronize with time server (NTP) setting to have the camera automatically check its time settings, but Internet access for the camera will be required to use this setting. If the CloudCam camera cannot reach the NTP server while using this setting, recording properties will be affected.

Step 6 – DW Spectrum Professional Setup
While the CloudCam camera contains the recording media and Edge Server program, users will need to utilize the DW Spectrum Client to directly interact with the DW Spectrum Professional platform and to complete the CloudCam setup.
Part 6.1 – Install DW Spectrum Client
If you have not already done so, install the DW Spectrum Client program on a computer.
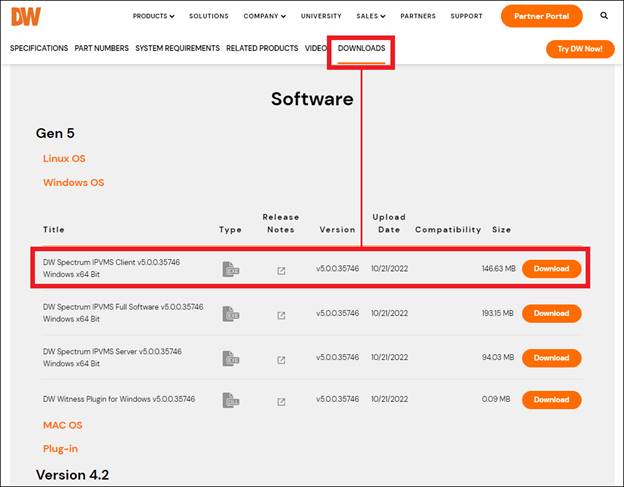
You can find the current and previous versions of the DW Spectrum Client on the DW Spectrum Professional product page. Scroll down and select the Downloads tab, then locate the Software section to obtain the installation file for the DW Spectrum Professional Client.
**NOTE: Make sure to use the same version of DW Spectrum Client that matches the version of DW Spectrum Edge that is being used by your CloudCam camera. DO NOT install the DW Spectrum Bundle or DW Spectrum Server programs as this will also install the desktop server version on your computer, which can create problems with CloudCam cameras.
Part 6.2 – Finding the CloudCam with DW Spectrum Client
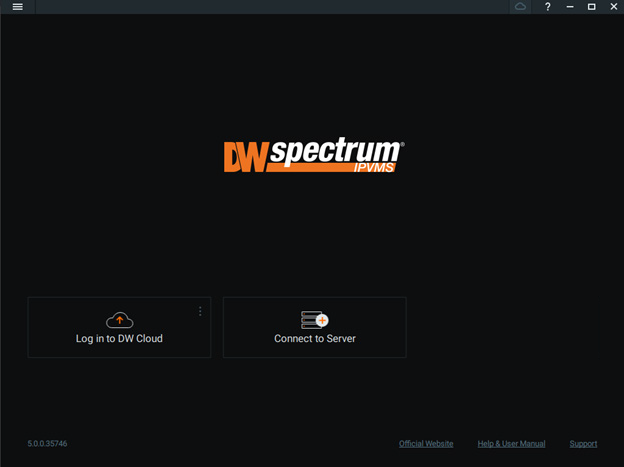
After installing the DW Spectrum Client, launch the application.
The DW Spectrum Client will automatically scan the local network for DW Spectrum Systems and should detect the CloudCam camera’s Edge Server. Select the Edge Server and enter the Owner credentials.
- Default Edge login is admin|admin12345
- You can change the Owner/admin password for the new CloudCam system in the User settings menu within the DW Spectrum Client. Be aware that the DW Spectrum System password is a separate set of credentials from the login used when logging in to the CloudCam camera directly with its web interface.
If the DW Spectrum Client does not automatically detect the CloudCam Edge Server, click the “Connect to Server” tile to manually input the CloudCam Edge Server’s IP address, Port (default is 7001), and Owner login.
**NOTE: If you have connected multiple new CloudCam cameras to the network and the DW Spectrum Client has detected several new Edge Servers, select one to act as the lead server. The additional CloudCam cameras can be merged (up to 30 CloudCam cameras) in with the lead server to create a single, unified CloudCam System later.
**WARNING: If you are using a pre-built DW Blackjack Server during this setup, DO NOT use the localhost tile when setting up your CloudCam cameras. This may inadvertently lead you to merge CloudCam cameras with the desktop server type.

Part 6.3 – Disabling Time Synchronization (optional)
If the CloudCam camera does not have Internet network access, it is recommended to disable the Time Synchronization setting from within the DW Spectrum Client. This will ensure that the CloudCam Edge Server does not attempt to synchronize with an NTP Server (time server), which could lead to issues with recording properties.
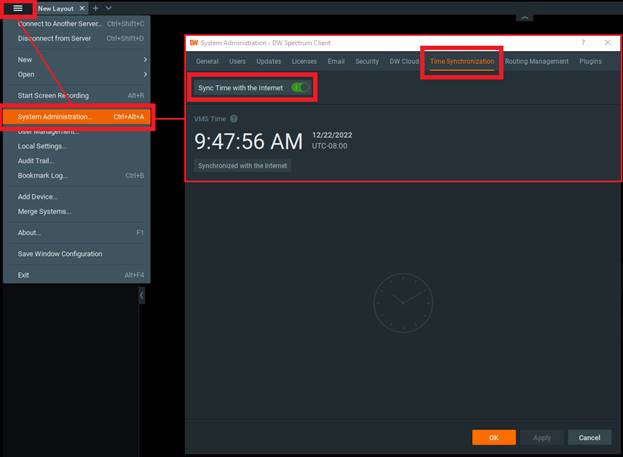
To disable time synchronization:
- Open the Main Menu and select “System Administration”.
- In the System Administration window, select the “Time Synchronization” tab.
- Disable the “Sync Time with the Internet” setting.
Part 6.4 – Verifying Recording Licenses
By default, the CloudCam camera will come with one (1) DW Spectrum Edge License applied. You can verify that the license has been activated by using the DW Spectrum Client.
Open the System Administration > Licenses menu and verify that there is at least one (1) DW Spectrum Edge License per added CloudCam camera.
Part 6.5 – Verifying Storage
By default, the CloudCam camera will come with one (1) DW Spectrum Edge License applied. You can verify that the license has been activated by using the DW Spectrum Client.
Open the System Administration > Licenses menu and verify that there is at least one (1) DW Spectrum Edge License per added CloudCam camera.
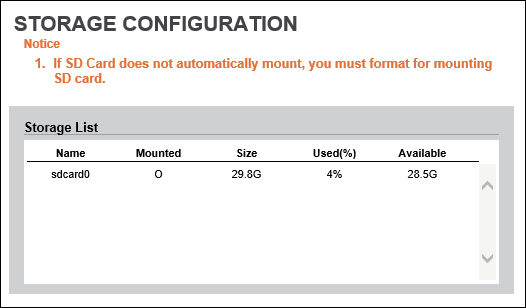
The CloudCam camera’s SD Memory Card acts as the local storage for the Edge Server.
To verify that the storage is detected by the Edge Server:
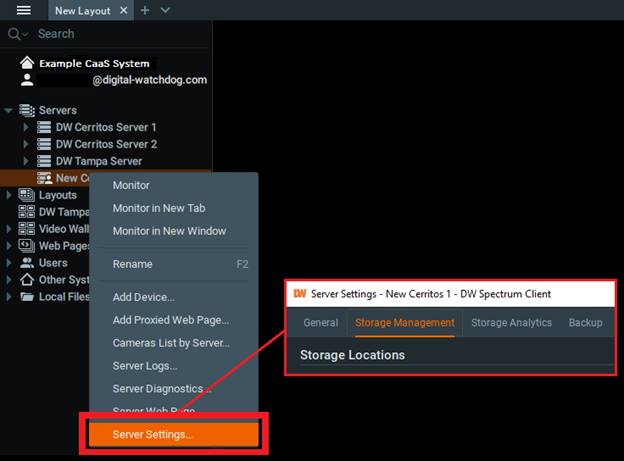
- Right-click on the Server (left panel) and select “Server Settings”.
- Select the Storage Management tab and verify that the SD Memory Card storage is detected and enabled for recording.
- If the SD Memory Card is not detected for the Server, you may need to format the SD Memory Card using the CloudCam camera’s web interface (Storage Configuration menu).
Part 6.6 – Configuring Recording
If the DW Spectrum Edge License and SD Memory Card Storage have been confirmed for the CloudCam camera, activate the recording function for the camera.
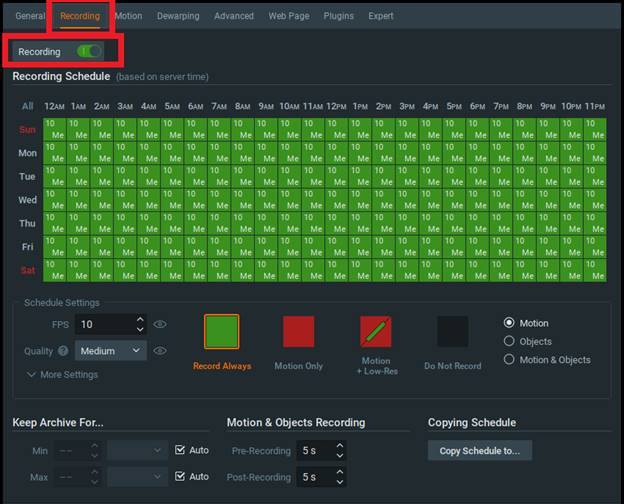
Right-click on the camera (left panel), select “Camera Settings”, then click on the Recording tab.
In the Recording menu, activate the “Recording” toggle to enable the license and allow the camera to record video for the Edge Server. You can configure the recording settings for the camera in the Recording Schedule section of the menu.
Be sure to click the Apply button to save any changes.
Part 7 – Merging Additional CloudCam Cameras
If you have additional CloudCam cameras connected to the local network, you can now merge them with the lead Server to create a single, unified CloudCam System. You can merge up to 30 individual CloudCam Cameras into a single system.
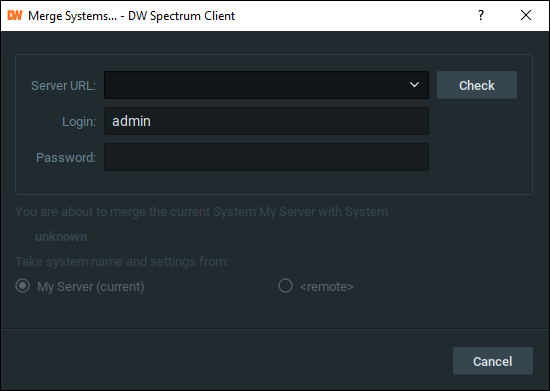
To merge, right-click on the System (left panel) and select “Merge Systems”.
In the Merge Systems window, enter the IP address of the additional CloudCam camera that you want to merge. You can click the drop-down in the Server URL box to select a detected System.
- Default Edge login is admin|admin12345

This completes the initial setup of the DW MEGApix CloudCam Camera System. You may configure your System by adding it to your DW Cloud account or expand storage by adding an external DW NAS Device if needed.
______________________________________________________________________________
For More Information or Technical Support
DW Technical Support: https://www.digital-watchdog.com/contact-tech-support/
DW Sales: [email protected] | www.digital-watchdog.com
Rev: 06/25 Copyright © DW. All rights reserved. Specifications and pricing subject to change without notice. ![]()

