

DW Blackjack Camera Network Setup (Windows)
-----------------------------------
Affected Roles: Owner, Administrators
Related Digital Watchdog VMS Apps: DW Spectrum® IPVMS
Complexity: Medium
Last Edit: November 3, 2021
-----------------------------------
Camera Subnet
When setting up the DW Spectrum Server, the host computer relies on its networking setup to communicate with the connected security devices over the local network.
For this to work, the DW Blackjack unit’s network settings will need to be configured to identify with the camera network, as well as with the router and other local devices.
This article will outline a basic network setup for DW Blackjack Server using a Windows OS.
Supported/Affected Devices
- DW Blackjack® Cube (Windows)
- DW Blackjack® P-Rack (Windows)
- DW Blackjack® E-Rack (Windows)
- DW Blackjack® Mid-tower (Windows)
- DW Blackjack® Tower (Windows)
- DW Blackjack® RACK (Windows)
Setup Process
- If you are using a DW Blackjack Series unit as the Server, there may be two NIC cards (see sample image).
Connect network cables to the Server’s Network Interface Controller (NIC). It is recommended to connect the PoE switch directly to the Server rather than to the router in order to avoid creating bitrate ‘bottlenecks’ between the cameras and the Server.
**NOTE: If you are using a Custom Built Server (not manufactured by Digital Watchdog), and have not yet added DW Spectrum, please read Installing DW Spectrum (Windows).

- Open the Network Connections menu.
(Control Panel > Network and Internet > Network and Sharing Center > Change Adapter Settings)
- Select the Ethernet adapter that is connected to the camera network’s PoE switch.
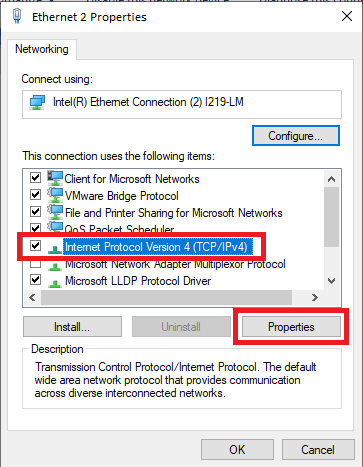
Right-click on the Ethernet adapter, then select Properties.

- Select Internet Protocol Version 4 (TCP/IPv4) from the Ethernet Properties pop-up window, then click the Properties button.
- Select Use the following IP address, then assign an IP address to the camera network NIC card. This address will be used to identify the computer within the camera network.
****NOTE: It is important that the Server is not assigned to an IP address that is also being used by any other devices within the network.
Additionally, the camera NIC’s IP address scheme must match the camera network’s sub-network IP address scheme.


- Enter Subnet mask of 255.255.255.0
Leave the Default Gateway blank. The Default Gateway information is not necessary for communicating with the camera network when the Network NIC and the Cameras NIC are being used separately.

- Click the OK button to apply the changes to the NIC card.
Cameras assigned to IP addresses that also identify with the camera subnetwork, and that are connecting through the camera network NIC, should now be able to communicate and be added to DW Spectrum.
**NOTE: If you still need to assign an IP address to a camera, please read Assigning A Static Address To New Or Defaulted Cameras.

