Table of Contents
Select Channel Partner Account
Managing Team Members (Channel Partner Profile)
Reports and Transaction History
Audience and Scope
The DW Connect Portal is used to manage sub-Channel Partners, Organizations, and available Subscription Services. The DW Connect Portal does not provide access to any Site devices, video data, or VMS settings.
Key Concepts
The DW Spectrum Enterprise Edition introduces a new hierarchical structure that enables optimized configuration controls and new accounting models that increase operating margins and reduce management overhead.
Channel Partners
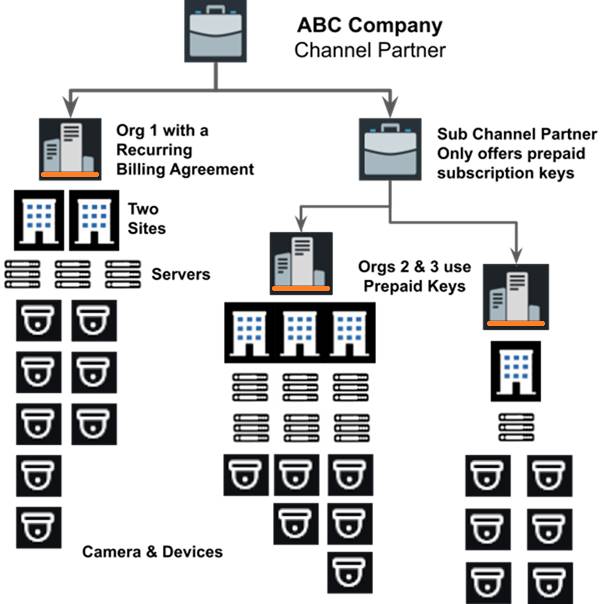
The primary Channel Partner resides at the top of a reseller hierarchy. Additional sub-Channel Partners and Organizations are created to resell or consume Subscription Services. The sub-Channel Partner concept can expand over multiple levels, with each sub-Channel Partner being responsible to their own primary partner for all costs incurred by their downstream Organizations and sites.
Organizations
Organizations are created by Sub/Channel Partners using the DW Connect Portal. An Organization can contain an unlimited number of sites.
While Sub/Channel Partners set the price for all Subscription Services available to an Organization - it is the Organization Administrator who uses the Cloud Portal, not the DW Connect Portal, to configure the Organization, manage Organization-level users, and Channel Partner access to the Organization.
See the Organization Administrator User Guide for additional information about managing an Organization.
Sites and Systems
A Site is one or more servers treated as a VMS installation. The term Site replaces the term System that has historically been used to reference a collection of servers.
Subscription Services
Subscription Services are billed as a recurring monthly charge while Subscription Keys offer a prepaid number of service channels to be active over a fixed period of time within an Organization.
Terms and Acronyms
|
Term |
Definition or Functional Description |
|
Sub-Channel Partner |
Sub-Channel Partners are created by the active Channel Partner to enable trusted entities to replicate the partner and Organization model. |
|
Team Member of a Sub/Channel Partner |
Users who access the DW Connect Portal to manage Organizations, sub-Channel Partners, and define the available Subscription Services. |
|
Subscription Services |
A function or feature that is billed on a month-to-month basis. |
|
Subscription Key |
One or more Subscription Services that are valid for a fixed duration. |
|
Organization |
A virtual container of Sites that share data and configuration settings. Organizations are allocated and consume Subscription Services. |
|
Organization User |
Cloud users that are managed by the Organization Administrator. |
|
Site (System) |
Starting with Generation 6 VMS, the term Site replaces System as the term for representing one or more Servers acting as a single entity. |
|
Cloud User Account |
A Cloud account is an online set of credentials used to grant access to Partners, Organizations, Cloud-Connect Sites, and the DW Connect portal. |
|
Local User Account |
Local users are created within a Site and limited to resources on the local network. Local users cannot access the Cloud Portal or the DW Connect Portal. |
|
DW Connect Portal |
An online tool where team members of a Channel Partner manage the settings for their sub-Channel Partners and Organizations. |
|
Cloud Portal |
An online tool where Organization Administrators and authorized Cloud Users manage Sites (Systems) and interact with resources and data. |
Hierarchical Billing Model for Services
Digital Watchdog is the root VMS vendor enabling Channel Partners who can choose to offer Sub-Channel Partners and Organizations various services. Channel Partners are financially responsible for all Subscription Services consumed by their Sub-Channel Partners and Organizations.
Team Member Roles
Currently one functional role (Administrator) and two non-functional placeholder roles are selectable.
|
User Role |
Permitted actions |
|
Administrator |
|
NOTE: The roles of Manager or Accountant do not grant access and may have unpredictable result.
Operational Status
The Operational Status is applied to all Sub/Channel Partners and Organizations reporting to the entity and serves as a method to toggle user access and prevent additional charges by halting Subscription Services.
All Services allocated to a Sub/Channel Partner and their Organizations will be revoked if the providing Sub/Channel Partner changes the Operational Status of an entity to Shutdown.
|
State or Status |
Functional Description |
|
Active |
|
|
Suspended |
|
|
Shutdown |
|
User Interface
The DW Connect interface contains dynamic elements that display information based on the role and permissions of the currently signed-in user with respect to the active Channel Partner.
DW Connect uses the following elements to present information and provide navigation:
- A persistent header that includes a search function and user profile controls.
- The left panel menu is used to select between partners, Organizations, usage statements, and keys (if applicable).
- A central panel displays selected information and enables interaction with the selected content.
- Pop-over dialogs are presented to collect or confirm specific information.
- A full screen overlay slides over the display to provide focus to a subset of the primary display.
- Action buttons in the corners can dismiss a panel, save & continue, or cancel pending changes.
This guide shows navigation menus, controls, and dialog boxes that may not be available to all team members while using the DW Connect Portal.
Header Menu
Along the top of the DW Connect interface are the following controls, listed from left to right:
-
- A product logo that returns users to the landing page for the active Channel Partner.
- A search function to route to Channel Partners, Organizations, and usage statements.
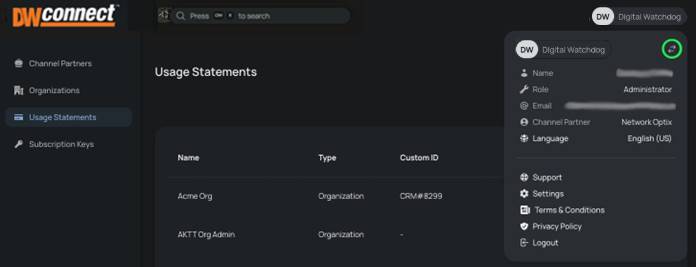
- A user profile dialog that opens to display these additional controls.
- Switch between available Channel Partners.
- View your name, email, and role within the active Channel Partner.
- Access support and service links.
- Open the DW Connect settings panel, including viewing and managing language
- Review the Terms & Conditions and the Privacy Policy.
- Logout
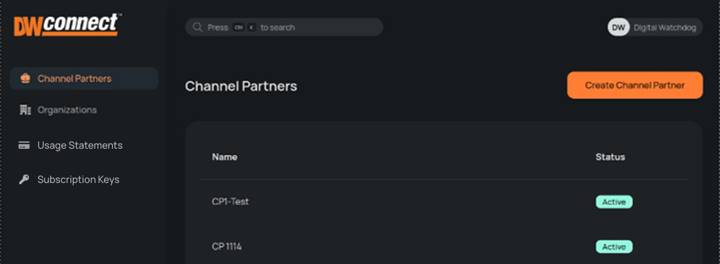
Channel Partner Tab
Select the Channel Partners tab in the left panel to display all Sub/Channel Partners that report to the active Channel Partner and their status. Click on the name of a Sub/Channel Partner to display a summary page containing usage trends, services available, recent service changes, and contact information.
Use the Create Channel Partner button to open the New Channel Partner dialog.
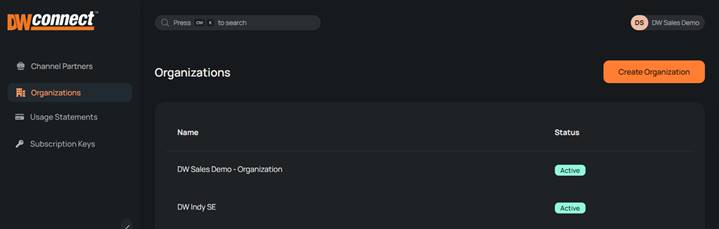
Organizations Tab
Select the Organizations tab on the left panel to display all Organizations that report to the active Channel Partner, and their status. Click on the name of an Organization to display a summary page containing usage trends, services available, recent service changes, and contact information.
Use the Create Organization button to open the New Organization dialog.
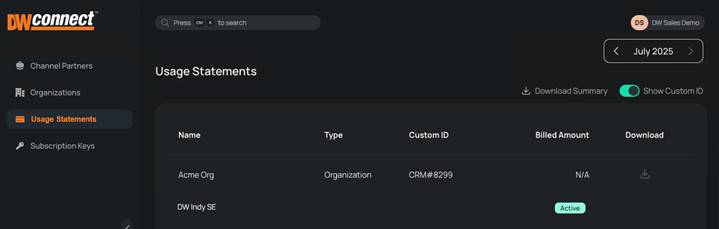
Usage Statement Tab
Select a named entity type to explore and expand the usage statement in detail. Detailed usage statements can be downloaded in either .CSV or .XLSX format by clicking the download icon for an entity and selecting the desired format. Use the Show Custom ID slide-switch to toggle the optional ID display.
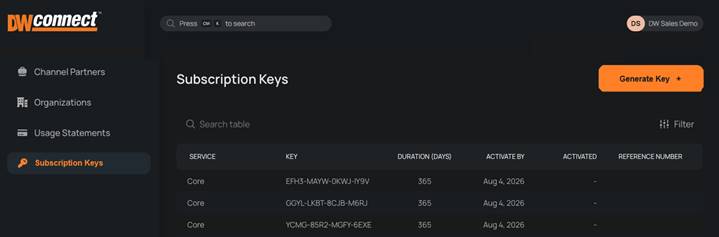
Subscription Keys Tab
The subscription key tab lists the generated by the Channel Partner, the service provided by the key, the last date to activate the key, key activation details, and the optional reference number at key generation.
NOTE: Only Channel Partners authorized to generate subscription keys will see the subscription key tab.
Settings Menu
Click the Settings icon and label at the bottom of the left panel or from within the user profile popup.
See these related topics for additional information about available settings.
Channel Partner Profile
- Company Information – displays the recorded company name, address, and website information.
- Contact Information – provides email addresses for key contacts.
- Services – provides a summary of available services. See Manage Services to make changes.
- Currency – shows the currency that your Channel Partner is billing you in and allows you to set a currency for your customers.
- Team Members – where you can add, edit, or remove users.
- Branding - allows you to set a color accent for the profile popup.
User Profile
- Appearance – where you can set the application’s theme (i.e. dark, light).
- Language – set the preferred language for the application interface.
- Support – displays the options to contact DW Support an generate a debug (log) file.
Login to DW Connect
Open DW Connect Portal, select your language, and sign in using your DW Cloud credentials.
New users must Sign up for an DW Cloud account, validate their email address, and have their Sub/Channel Partner administrator add the new account as a Channel Partner team member.
https://dwconnect.digital-watchdog.com

Create a DW Cloud Account
A DW Cloud account is a single-user credential that provides access to multiple cloud-connected products and services using various client devices. Accounts are free and fully activated upon email confirmation.
- Click the Sign-Up link on the DW Connect landing page or the DW Cloud homepage.
- Enter your email address and other required information; review the terms and privacy policy.
- Follow the instructions found in the system-generated email to complete your account setup.
NOTE: Users added to cloud products before creating a cloud account will receive an invitational email.
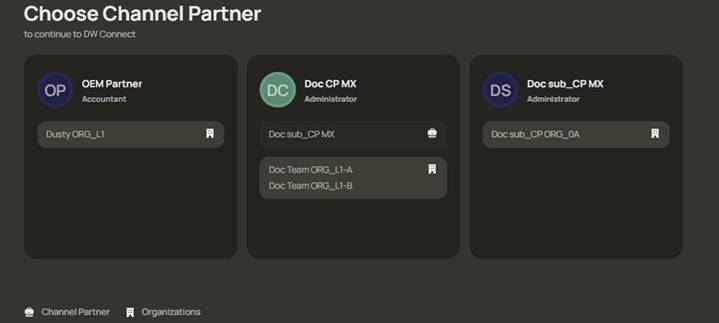
Selecting a Channel Partner Account
The information in this section only applies to users who manage multiple Sub/Channel Partners
After successfully signing into DW Connect, the landing page displays all the Sub/Channel Partners available. Click on any available Sub/Channel Partner card to open the partner settings.
Changing Active Channel Partners
To switch active accounts, click on your user profile in the upper right-hand corner and select the switching arrows( ← → ) to display the Channel Partner selection dialog.
Managing Channel Partners
Creating a sub-Channel Partner enables separate Organizations, Sites (Systems), and users to be managed by a delegate team while still falling under the originating Sub/Channel Partner authority.
Creating a Channel Partner
- Log into DW Connect as an Administrator and select the Channel Partner to manage.
- Select the Channel Partners tab on the left side menu.
- Click the Create Channel Partner button and navigate through the Channel Partner creation panel using the Next and Back buttons, and not your browser's back or forward buttons.
- Company Information (name, address, website).
- Contact email address for the account manager, administrator, and accountant (optional).
- Settings:
- Usage Based Billing (monthly subscription services) defaults to OFF allowing only prepaid Subscription Keys. Enable the switch to make both Subscription Keys and Subscription Services available. This setting is applied to all sub-entities.
- Custom ID is an optional, free form field that can hold CRM or account information.
- The final screen is a summary of the new Channel Partner. Click the Create button after reviewing all elements and details as Channel Partners cannot be removed once created.
NOTE:
- The Administrator is notified via email about the new Organization they are the administrator for.
- The Account Manager is notified if the user is not part of the active Channel Partner.
- The Accountant does not receive any user-related emails
The newly created Sub/Channel Partner will be available within the DW Connect portal shortly.
Deactivating a Channel Partner:
Sub/Channel Partners cannot be removed or deleted from the DW Connect environment.
Inactive Sub/Channel Partners, or those created in error, should have changed their status to “SHUTDOWN”.
Changing the Status of a Channel Partner
Review the descriptions of the available States before taking this action. State changes apply to all Sub/Channel Partners, Organizations, and Sites within the Sub/Channel Partner undergoing the status changes.
- Log into DW Connect as an Administrator and select the Channel Partner account to manage.
- Use the global search function or browse the Channel Partners tab in the left-panel menu.
- Select the Sub/Channel Partner to modify from the search results or the table displayed.
- Click the Edit button in the upper right-hand corner to select a Status.
- Select the intended Status and click the Next button.
- Confirm the Status change by clicking the Edit Status confirmation button.
NOTE:
- Status changes are nearly instantaneous and applied to all downstream entities.
- Suspended and shut down states will block site access by cloud users.
- Connected cloud users will be disconnected with limited notice or delay.
- Recording will be stopped when a Sub/Channel Partner status is changed to shut down.
Managing Team Members (Channel Partner Profile)
Adding Team Members:
- Log into DW Connect as an Administrator and select a Channel Partner account to manage.
- Click on the Settings gear icon at the bottom of the left panel menu to open the Settings dialog.
- Select Team Members on the left side menu of the Settings dialog.
- Click the Add New Team Member button above the list of existing users.
- Provide the email address of the new user and select their role.
- Click the Save button to finish adding the user.
NOTE: Users without an existing DW Cloud account will receive an email inviting them to create an account.
Editing Team Members:
- Log into DW Connect as an Administrator and select the Channel Partner account to manage.
- Click on the Settings gear icon at the bottom of the left panel menu to open the Settings dialog.
- Select Team Members on the left side menu of the Settings dialog.
- In the Team Members list, open the 3-dot menu to the right side of the Name field.
- Select Edit Team Member from the 3-dot pop-up menu.
- Make the intended changes to the Team Member account and click Save.
Deleting a Team Member:
- Log into DW Connect as an Administrator and select the Channel Partner account to manage.
- Click on the Settings gear icon at the bottom of the left panel menu to open the Settings dialog.
- Select Team Members on the left side menu of the Settings dialog.
- In the table of Team Members, open the 3-dot menu to the right side of the Name field.
- Click on the Delete Team Member text at the bottom of the User attributes window.
- Click the Delete Team Member button in the confirmation dialog; this cannot be undone.
Company and Contact Information (Channel Partner Profile)
Maintain contact information, physical addresses, and website for the Sub/Channel Partner.
- Log into DW Connect as an Administrator and select the Channel Partner to manage.
- Click on the Settings gear icon at the bottom of the left panel menu to open the Settings dialog.
- Select Company Information on the left-side menu to display contents and enable editing.
- Select Contact Information on the left side-side menu to display contents and enable editing.
Branding (Channel Partner Profile)
NOTE: This feature is under development. Currently, only the Sub/Channel Partner ‘profile color’ can be set.
- Log into DW Connect as an Administrator and select the account to manage.
- Navigate to the Channel Partner to configure.
- Click on the Settings gear icon at the bottom of the left-side menu to open the Settings dialog.
- Select Branding on the left side menu.
- Choose the color pattern that will be applied to the Channel Partner profile placeholder.
- The color pattern is immediately applied without the need to save or confirm changes.
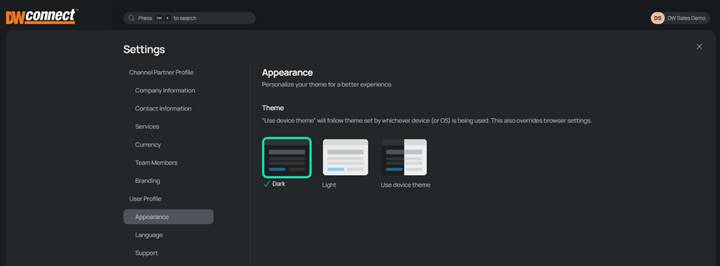
Interface Appearance (User Profile)
The interface defaults to dark mode, while providing options to select light mode or system settings.
- Log into DW Connect.
- Find the Settings gear icon at the bottom left-side menu or within the user profile details.
- Select Appearance on the left side menu.
- Choose the interface theme (system, dark, light)
- The theme is immediately applied without the need to save changes.
Interface Language (User Profile)
The interface defaults to English (US) with the option to select from a list of available languages. Changing the language setting will update menus, dialog screens, and the formatting of numbers and dates.
Language settings changes are saved to the user’s profile and applied to future logins to DW Connect.
NOTE: Not all available language translations are 100% complete. The approximate percentage of content translated is listed below the language. Additional languages will continue to be added.
- Log into DW Connect.
- Find the Settings gear icon at the bottom left-side menu or within the user profile details.
- Click on Language to open the language selection dialog.
- Click the expansion control next to the current language to open the selection menu.
- Select the desired language to see the changes immediately applied.
- Close the language selection dialog as language changes are automatically saved when applied.
Currency Options
There are two currency settings within the DW Connect Portal: assigned currency and your currency.
-
- Assigned Currency:
- The currency between the active account and the Channel Partner providing services.
- Only the parent Sub/Channel Partner who is providing services can change the Assigned currency.
- Your Currency:
- The currency between the active Channel Partner and Sub/Channel Partners.
- When you provide (resale) Services, you define the currency and service cost.
- Assigned Currency:
Changing Your Currency
- Log into DW Connect as an Administrator and select the Channel Partner account to manage.
- Click on the Settings gear icon at the bottom of the left-side menu to open the Settings dialog.
- Select Currency on the left side menu – select the desired currency in the Your Currency list.
- Confirm the currency change within the dialog pop-up box.
- Review and update every service price your Channel Partner has set. Exchange rates are not applied when the currency is changed, which can create significant discrepancies.
Managing Organizations
Creating an Organization
- Log into DW Connect as a Sub/Channel Partner Administrator.
- Select the Organizations tab in the left side menu.
- Click the Create Organization button. Be sure to navigate through the four creation dialog screens using the in-dialog Next and Back buttons, without using your browser’s Back button.
- Company Information (name, address, website).
- Sub/channel partner access to the organization and an optional accounting reference ID.
- An Organization Administrator can manage all sites and services in the organization.
- System Health Monitor can view site performance metrics and manage services.
- Subscription Service Manager is limited to subscription management within the site.
- Contact details for the Account Manager, Administrator, and Accountant.
- If the active Channel Partner has access to Subscription Services, service availability and pricing is applied to the Organization being created.
- Click the Create button in the final Create Organization dialog screen once all elements and details of the new Organization have been properly and completely entered and reviewed.
NOTE:
- The Administrator is notified via email about the new Organization that they are overseeing.
- The Account Manager is notified if the user is not part of the active Channel Partner.
- The Accountant does not receive any user-related emails.
The newly created Organization will be available within the DW Connect portal.
Changing the Status of an Organization
Please review the descriptions of Status conditions before taking this action, as Status changes apply to all Sites, Servers, and Cloud users downstream of where a status change is made.
- Log into DW Connect as an Administrator.
- Use the global search function or browse the Organization tab in the left menu panel.
- Select the Organization to modify from the search results or the displaying list.
- Click the Edit button in the upper right-hand corner to open a menu and then select Status.
- Select the intended Status and click the Next button to advance the dialog.
- Confirm the Status change by clicking the Edit Status confirmation button.
NOTE: Cloud Users cannot access an Organization that is not in an active status.
Removing an Organization
An Organization cannot be removed once it has been created. Set the operational status of inactive Organizations to “SHUTDOWN” to prevent Subscription Services from being used and/or incurring additional costs to the entity.
Managing Services
The Services available to Sub/Channel Partners and Organizations are first defined when creating Sub/Channel Partners and Organizations, with unlimited revisions permitted.
Overview of Services
- The Sub/Channel Partner sets the types of Subscription Services available to Sub/Channel Partners, and all Organizations, can vary between branches of the same Sub/Channel Partner.
- Sub/Channel Partners set the number of Subscription Services available to an Organization, and Organizations are invoiced for all available Subscription Services, including those not installed.
- Changes to Subscription Services are pro-rated (daily) when changed between billing cycles.
- All Services allocated to a Sub/Channel Partner and their Organizations will be revoked if the providing Sub/Channel Partner changes the Operational Status of an entity to “SHUTDOWN”.
- Service Subscriptions can incur a net loss when set below the reseller’s purchase price.
Service Types Available
The initial Subscription Services replicate the core features licensed by the DW Spectrum Professional Edition within an adaptive framework, designed to support a growing catalog of service types to be added over time.
|
Service Name |
Functional Description |
|
Core |
|
|
Demo Core |
|
|
Credit Core (pending) |
|
Manage Services
The Manage Services panel is where additional services can be added to a Sub/Channel Partner or an Organization. There are slight differences between the dialog screens used for Sub/Channel Partners and Organizations while the overall methodology to enable and set service pricing remains consistent.
- Log into DW Connect as an Administrator for the Channel Partner to manage services.
- Use the global search function or browse the Channel Partners and Organizations tabs in the left panel menu to locate the entity for which services will be managed.
- Locate the controls to prompt the dialog for managing services.
- For Sub/Channel Partners, the Manage Services button is to the right of the Channel Partner name.
- For an Organization, click the Manage button to open a mini-menu and select Services.
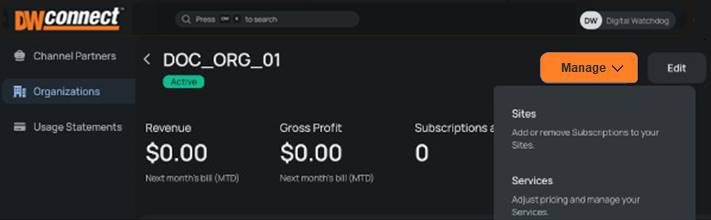
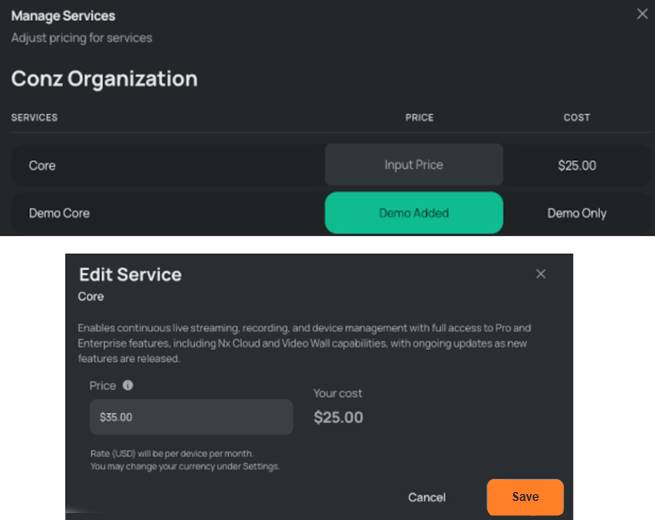
Enabling and Pricing Services
A Channel Partner selects the services available to their Sub-Partners and Organizations, including the prices charged for each service. A profit is generated for the service broker when services are retailed for a higher price than they are acquired.
- Open the service management panel for a Channel Partner or Organization.
- Active services have their card title visually highlighted in bright green.
- To add a service, select a service card that does not have a price and click the Input Price button.
- To view your cost and change the price charged, click on the service title and edit the price.
- Click the Save button to make any changes before exiting the Manage Services window.
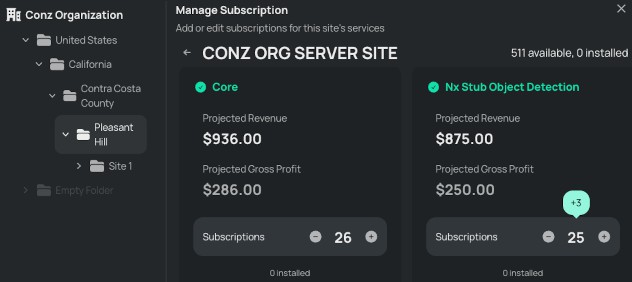
Quantity of Services Available
One Core Service is required for each device that will record a video stream. Service costs are calculated by the number of available Service Subscriptions, including those not installed, active, or in use.
- Log into DW Connect as an Administrator or Manager.
- If you have access to more than one Sub/Channel Partner, you will first need to select the Channel Partner overseeing the Organization and site where the service changes are being made.
- Open the Organization where the service changes are being made.
- Select the site by clicking the site card or by using the Manage dropdown menu and selecting “Sites”.
- With the Manage Subscription dialog open for the site, adjust the quantity of each available service using the + or – buttons, or by manually entering new values.
- The Projected Revenue and Projected Gross Profit information will automatically update after each quantity change.
- After making all necessary service adjustments, click the Continue button.
- A summary of changes will be displayed. Confirm the changes or go back to make additional adjustments.
NOTE: Changes to available Subscription Services are prorated within the next billing cycle.
Subscription Keys
Digital Watchdog and its authorized resellers are the sole generators of subscription keys.
Subscription Keys offer prepaid, fixed-duration access to the same Subscription Services provided under a recurring subscription model. Fundamental differences are detailed in the following table.
|
|
Recurring Subscription |
Subscription Key |
|
Billing Cycle |
Monthly, post-paid. |
Prepaid keys are currently available in one, two, or three year increments. |
|
Service Quantity Adjustments |
Daily changes to available services are prorated within each billing cycle. |
Adding Subscription Keys can increase total Services or add additional time. Expiration date cannot exceed 4 years. |
|
Consumption Model |
Services are billed by the number available and not the number in use. |
The duration of all services provided by a key begins upon key activation. |
|
Service Types Available |
Core & Core Demo |
Core |
|
Maximum Number of Services |
Unlimited |
Unlimited |
|
Cancellation Policy |
Subscriptions can be removed at any time with billing prorated to the day. |
Keys cannot be refunded once purchased by the channel partner. |
|
Activation Timing |
Changes to subscription services are immediately applied to Sites. |
Keys are canceled, without refund, if not activated within 3 years of creation date. |
Generating Subscription Keys
Only authorized Sub/Channel Partners can view and access the Subscription key tab and information.
To generate a subscription key:
- Log into DW Connect and open the Channel Partner profile that is generating the Subscription Keys.
- Click the Subscription Key tab in the navigation panel.
- All Subscription Keys created by the active Channel Partner are displayed in a table format.
- Click the Generate Key + button to open the new Subscription Key configuration form.
- Fill out the key generation form:
- Service Type
- Duration – determines the length of validity once the key has been activated.
- Number of devices that each key will support.
- Quantity of keys – increase about 1 to generate multiple keys with the same configuration.
- Reference Number – optional, free-form field.
- Review the cost per month and the total cost of the keys to be generated, then click Next.
- Authorize the key purchase by selecting Generate. Generated keys cannot be refunded.
- Generated keys are presented for print or download. Alternatively, the key can be copied to keyboard (less than 50 keys) and will be visible when viewing the Subscription Keys tab.
NOTE: Keys activated by unauthorized users or within unintended organizations cannot be refunded.
Activating Subscription Keys
Subscription keys can be activated by Channel Partners within DW Connect. Adding additional subscription keys to an Organization will prioritize increasing the number of supported devices or extending the expiration date. All keys for a given service will be unified using a weighted average of the existing and the new keys.
To activate a subscription key:
- Select the Organization where the Subscription Key will be activated.
- On the Organization screen, click the Manage button and select Subscription Keys from the menu.
- After the Manage Subscription Keys panel is opened, click the Activate Key button.
- Enter or paste the Subscription Key then click on Check Key.
- Review the details of the Subscription Key and choose Next to continue.
- The final activation screen provides a final review. Click the Activate button to confirm. Subscription Key activation cannot be undone.
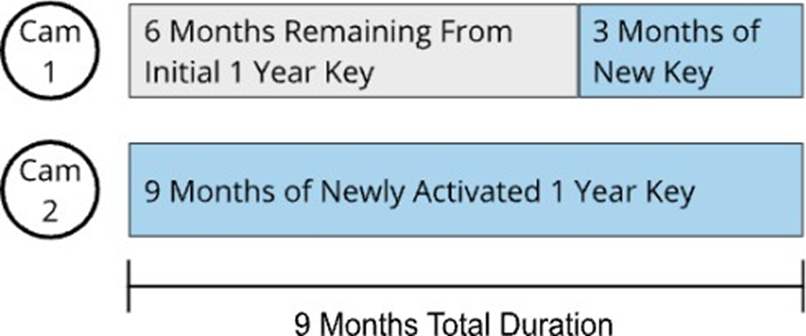
Example: A site has one camera (CAM1) with a one-year subscription key, currently halfway through its duration. A new camera (CAM2) is added using another 1-year subscription key. Instead of having two cameras with two different expiration days, a unified expiration date is set for both.
Allocating Subscription Key Service
While subscription keys and recurring subscription services can both be active within the same Organization, they do have unique allocation methods. See Managing Subscription Services.
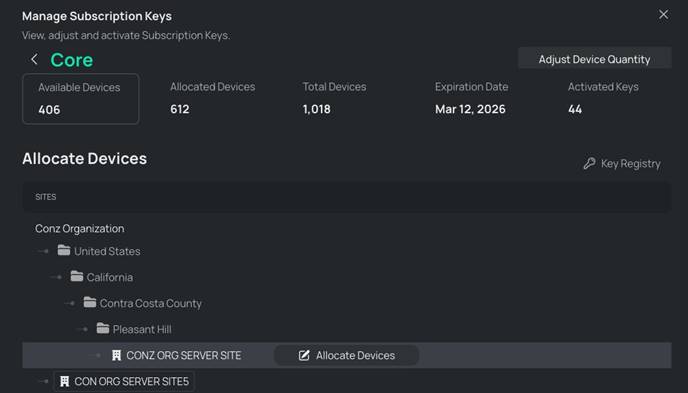
To allocate an activated Subscription Key:
- Log into DW Connect and select the organization where the subscription key will be activated.
- On the organization screen, click the Manage button and select Subscription Keys from the menu.
- After the Manage Subscription Keys screen opens, click the Service to allocate.
- Once a service type is selected, a list of sites within the organization will be displayed.
- Open the folder / Site where the allocation of Subscription Key services will be adjusted.
- Click on the row where Allocate Devices text is displayed in the highlighted organization.
- Directly edit the number of device services or click the (-) and (+) icons to increase or decrease.
- Click the SAVE button to apply the changes and return to the previous screen.
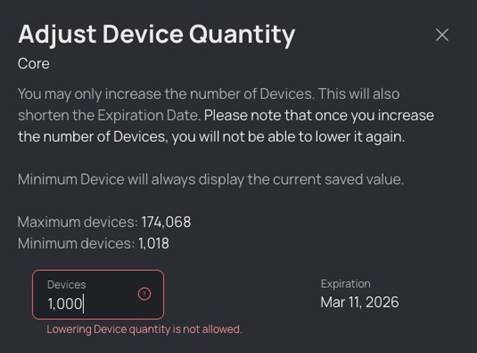
Adjust Device Quantity
The total number of devices available for a site can be increased by exchanging key duration for quantity of services available. The new key expiration date will be calculated and presented for approval before any changes are committed. It is not possible to reduce the number of devices to extend the expiration date of a key, which means that all device quantity increases cannot be undone once committed.
To increase devices by reducing the expiration date:
- Log into DW Connect and select the organization where the subscription key will be activated.
- In the Organization screen, click the Manage button and select Subscription Keys from the menu.
- After the Manage Subscription Keys pane opens, select a Service to increase its quantity.
- After selecting the desired service type, click the Adjust Device Quantity button.
- Enter an updated number of devices and review the revised expiration date.
- Click the SAVE button to apply the changes and return to the previous screen.
Reports and Transaction History
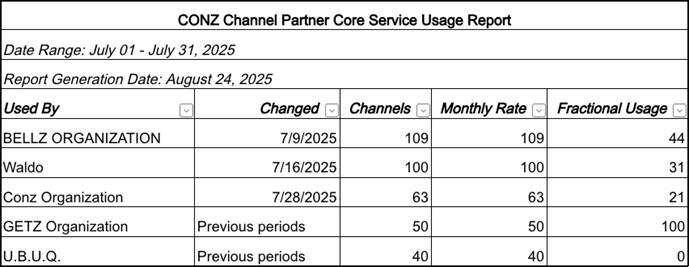
The subscription usage statements that are viewable from within DW Connect provide a simple and efficient summary of service usage and prorated adjustments for a selected billing month.
Additionally, a comprehensive and detailed report that covers all nested entities in either .CSV or .XLXS data format can be downloaded for offline review and analysis with third party applications.
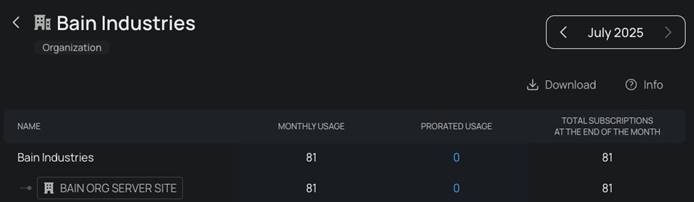
Viewing Usage Statements in DW Connect
- Log into DW Connect and select a Sub/Channel Partner or change Active Sub/Channel Partner.
- Select the Usage Statements tab on the left side menu to open a table of available reports.
- Click on the name of a Sub/Channel Partner or Organization to display additional details.
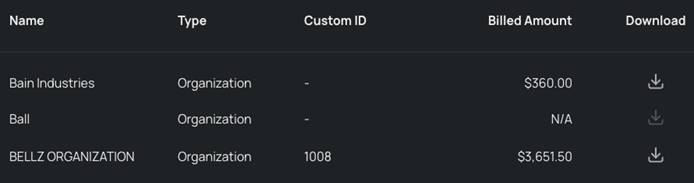
Downloading Customer Usage Statements
- Select the Usage Statements tab on the left side menu.
- Browse or search to find and open the customer.
- Within the list of entities, a download icon is available if a usage statement exists.
- Click on the download icon and select the desired file type to be downloaded.
Alternatively, the same download icon can be found when looking at the usage statement.
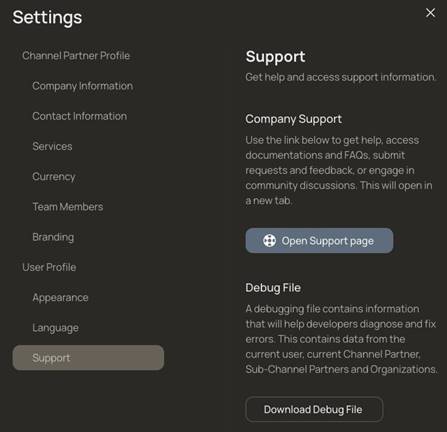
Support
Open the Settings Menu and click on the Support tab on the left-hand navigation to display available support services and an option to generate and download a debug file.
Support Webpage
Click the Open Support page button to launch a new browser tab that provides access to documentation, frequently asked questions, and a community of users who share best practices and key learnings.
Generate a Debug File
Support teams may need additional information when an error with the application is reported or suspected. Most often this includes what you were trying to do, the expected result, and then actual result.
To further assist application, support a Debug file may be requested. The debug file is generated and automatically downloaded by clicking the Download Debug File button. Your support contact may ask for this .JSON file while working to resolve a suspected issue.